...or Melt-In-Your-Mouth Pound Cake ...or White Velvet Pound Cake ...or The Best D@#% Pound Cake I've Ever Eaten! Any of these could be proper titles for this blog post. Seriously, this is THE pound cake to end all pound cakes. It's moist, rich, dense, flavorful, silky, delicious! The texture alone is what sold me on this pound cake recipe. It has no chemical leaveners, so it relies on whipping the batter up into a fluffy, sweet cloud in order for it to get a nice lift in the oven. And since cake flour is used instead of all purpose flour, each bite feels like silk on your tongue. It's pretty darn incredible! Tomorrow I'm going to get some juicy strawberries and make strawberry shortcake with it. Heck, I might even get a little crazy and use it to make a nutella-banana panini à la Amanda of Is This Thing On? Either way, I'm going to be in heaven for the next couple of days. And I can say that with confidence because I made TWO of these suckers!!
Whipping the fats, sugar, and eggs thoroughly will give you a light and airy finished batter. A scale comes in handy for making sure you fill both pans equally. Look at that crumb... yummy!
I originally came across this recipe on AllRecipes.com, but after further investigation, I noticed it's nearly identical to Smitten Kitchen's recipe. The following is an adaptation of ingredients and methods from both recipes, as well as some improvisation.
Cream Cheese Pound Cake Makes 1 large bundt, 1 10-inch tube cake, or 2 standard loaves
1 1/2 cups (3 sticks) unsalted butter, at room temperature 1 package (8 ounces) cream cheese, at room temperature 3 cups sugar 6 large eggs, at room temperature 3 cups cake flour 1/2 teaspoon salt 1 tablespoon pure vanilla extract 1 teaspoon almond extract
1. Preheat the oven to 325°F. Lightly butter a 10-inch tube pan, then line the bottom with parchment paper. Alternately, you can use 2 loaf pans. (I used 2 9x5" loaf pans and my cakes were somewhat short. I recommend using 2 8x4" pans.) 2. Place the butter, cream cheese, and sugar in the bowl of a stand mixer and beat on medium speed for 5 minutes. Add the eggs, one at a time, beating for 30 seconds after each addition and scraping down the sides of the bowl as needed. 3. Whisk together the flour and salt in a medium bowl. With the mixer on low speed, add half of the flour mixture. Gradually increase speed to medium and beat for 30 seconds. Beat in the extracts. Add the remaining flour and beat on medium speed for 30 seconds. Scrape the bowl thoroughly. 4. Pour the batter into the prepared pan(s) and shake lightly to even out the top. Bake until the cake is golden brown and a toothpick inserted in the cake comes out clean, 1 hour and 15 minutes. 5. Place the pan(s) on a cake rack and cool for 10 minutes, then remove the cake from the pan and let it cool completely. Serve at room temperature.
"OH-MY-GOSH!" Seriously, that's how they should rename this cheesecake. You'll only be able to say "OH-MY-GOSH" every time you take a bite. Actually, that's not true. Towards the end, it will be more like this... "OH-MY-GOSH, I'm going to throw up if I eat another bite, but OH-MY-GOSH-I-CAN'T-STOP!!" This is not a lie, people. I went to bed Wednesday night with a stomach so full of cheesecake, I couldn't even finish harvesting my Farmville crops! I was K.O.-ed by cheesecake! But it was allll worth it because I got to use up two lonely egg yolks that were hanging out in the fridge, AND I found my very first go-to cheesecake recipe. SUCCESS!!I'm kinda proud of my photos in this post. I guess the daylight just happened to be very suitable at the exact moment I got these shots because usually my photos are nowhere near this good! Sorry for tooting my own horn. You can tell me to stop whenever you'd like! ;)NEW YORK CHEESECAKE (from "The America’s Test Kitchen Family Baking Book") SERVES 12 Crust 8 whole graham crackers, broken into 1-inch pieces 6 tablespoons (3/4 stick) unsalted butter, melted and cooled, plus 1 tablespoon for brushing pan 3 tablespoons sugar
Filling 2 1/2 pounds cream cheese, cut into chunks and softened (I used 2 packs Neufchâtel and 3 packs regular) 1 1/2 cups (10 1/2 ounces) sugar 1/8 teaspoon salt 1/3 cup sour cream (I used reduced fat) 2 teaspoons fresh lemon juice 2 teaspoons vanilla extract 2 large egg yolks 6 large eggs
1. Adjust an oven rack to the middle position and heat the oven to 325 degrees. Process the graham cracker pieces in a food processor to fine, even crumbs, about 30 seconds. Sprinkle the melted butter and sugar over the crumbs and pulse to incorporate. Sprinkle the mixture into a 9-inch springform pan (I used a 10" pan and still got a tall cheesecake). Press the crumbs firmly into an even layer using the bottom of a measuring cup. Bake the crust until fragrant and beginning to brown, 10 to 15 minutes. Let the crust cool to room temperature, about 30 minutes.
2. Meanwhile, increase the oven temperature to 500 degrees. Beat the cream cheese in a large bowl with an electric mixer on medium-low speed until smooth, 1 to 3 minutes. Scrape down the bowl and beaters as needed.
3. Beat in half of the sugar and salt until incorporated, 1 to 3 minutes. Beat in the remaining sugar until incorporated, 1 to 3 minutes. Beat in the sour cream, lemon juice, and vanilla until incorporated, 1 to 3 minutes. Beat in the egg yolks and eggs, two at a time, until combined, 1 to 3 minutes.
4. Being careful not to disturb the baked crust, brush the inside of the prepared springform pan with melted butter. Set the pan on a rimmed baking sheet. Carefully pour the filling into the pan. Bake the cheesecake for 10 minutes.
5. Without opening the oven door, reduce the oven temperature to 200 degrees and continue to bake the cheesecake until an instant-read thermometer inserted in the center of the cake registers 150 degrees, about 1 1/2 hours, rotating the pan halfway through baking.
6. Transfer the cake to a wire rack and run a knife around the edge of the cake. Let the cheesecake cool until just barely warm, 2 1/2 to 3 hours, running a knife around the edge of the cake every hour or so. Wrap the pan tightly in plastic wrap and refrigerate until cold, at least 3 hours.
7. To unmold the cheesecake, wrap a wet, hot kitchen towel around the cake pan and let sit for 1 minute. Remove the sides of the pan and carefully slide the cake onto a cake platter. Let the cheesecake sit at room temperature for 30 minutes before serving. (I think this is a matter of preference. We liked ours cold, straight from the fridge!) The cooled, tightly wrapped cake can be refrigerated for up to 4 days.
STRAWBERRY TOPPING MAKES about 3 cups
4 cups (20 ounces) fresh strawberries, hulled and sliced thin 1/4 cup (1 3/4 ounces) sugar Pinch salt 1/2 cup strawberry jam 1 tablespoon fresh lemon juice (1 tablespoon cornstarch, my own addition)
1. Toss the strawberries, sugar, and salt together in a large bowl and let sit, stirring occasionally, until the strawberries have released their juice and the sugar has dissolved, about 30 minutes.
2. Process the jam in a food processor (or blender) until smooth, about 8 seconds. Simmer the jam in a small saucepan over medium heat until no longer foamy, about 3 minutes. Stir the warm jam mixture and the lemon juice into the strawberries. Let the topping cool to room temperature before serving, about 1 hour. Serve at room temperature or chilled.
(I chilled this mixture overnight, but I wanted it to be thicker, almost like pie filling. So, I strained the liquid off of the strawberries, reserved about 3 tablespoons of it in a measuring cup, and brought the rest to a simmer. I whisked 1 tablespoon of cornstarch into the reserved 3 tablespoons of strawberry juice, then stirred that into the simmering pot. I brought it back to a simmer and whisked it for about 3 minutes to thicken. I chilled that until completely cold, and then stirred it back into the strawberries. The result was a nice, thick strawberry glaze!)
It's no secret I'm a major hippie when it comes to my overwhelming love for granola. I used to swear by Bear Naked Fit vanilla almond crunch, as well as their fruit and nut granola. If it came down to me being able to put $5 worth of gas in my car or buying a bag of granola, let's just say I'd be sitting at home with a spoon and a big grin on my face! Don't worry about me ever running out of gas though, because I will never buy store-bought granola again. For my first homemade granola adventure I used a recipe by Ina Garten, but I followed Smitten Kitchen's wise adaptations. I omitted the butter and left out the brown sugar. Because after that King Cake, I thought it best to cut calories wherever possible. Instead of chopping dried fruit, I used 1 1/2 cups of a mix of Archer Farms Raisin Nut trail mix and Sunny Cranberry trail mix. Altogether I had raisins, golden raisins, cranberries, pumpkin seeds, sunflower seeds, and a few hazelnuts and pistachios (I picked out the whole almonds from both trail mixes). I also omitted the salt from the recipe, because the nuts in the cranberry trail mix were salted. And for the coconut I used shaved coconut instead of shredded because it was prettier! ;D On the day the granola is made, it's of the chewier variety. But as time passes, it becomes suitable for crunchy granola lovers. Either way, it tastes phenomenal! PS: It's also delicious crumbled over fresh fruit and yogurt! Another checkmark on my Top 100! Granola Bars Makes 12 to 16 granola bars
2 cups old-fashioned oatmeal 1 cup sliced almonds (I used slivered almonds) 1 cup shredded coconut, loosely packed (I used shaved) 1/2 cup toasted wheat germ 2/3 cup honey 1 1/2 teaspoons pure vanilla extract 1/4 teaspoon kosher salt 1 1/2 cups diced dried fruit (I used fruit and nut trail mix)
Preheat your oven to 350°F. Butter an 8×12-inch baking dish and line it with parchment paper.
Toss the oatmeal, almonds, and coconut together on a sheet pan and bake for 10 to 12 minutes, stirring occasionally, until lightly browned. Transfer the mixture to a large mixing bowl and stir in the wheat germ. Reduce the oven temperature to 300°F.
While the mixture is still warm, stir in the honey, vanilla and salt until the mixture is well coated, then the dried fruit. Pour the mixture into your prepared baking dish and press, press, press it in (wet fingers and/or a silicon spatula work great for this) until the mixture is packed as tightly as possible.
Bake for 25 to 30 minutes, until light golden brown. Cool for 2 to 3 hours before cutting into squares.
Store in an airtight container between sheets of wax paper.
I'm not much into Mardi Gras, mostly because I don't know a lot about it. Also because I live in Virginia, and it's just far enough away from New Orleans that we don't hear any of the noise from the all-night street parties. The only thing I know about Mardi Gras is that the celebration includes a pastry known as King Cake. Here's a tidbit from Wikipedia for you:
A king cake is a type of cake associated with the festival of Epiphany in the Christmas season in a number of countries, and in other places with Mardi Gras and Carnival. In the United States, which celebrates Carnival ranging from Pensacola, Florida to East Texas, centered on New Orleans it is associated instead with Mardi Gras season traditions. The cakes have a small trinket (often a small plastic baby, sometimes said to represent Baby Jesus) inside, and the person who gets the piece of cake with the trinket has various privileges and obligations (such as buying [or making] the cake for the next celebration).
A cake with a plastic baby inside!! How could you not be into that?? I omitted the baby because I know it's gonna always be me making the king cake, and that's okay by me! ;D
Another successful checkmark on my Top 100 list! If you've never had King Cake before, it tastes very similar to a cinnamon roll. It's chewy and sweet and sugary and delicious! It's a tiny bit time consuming and requires some effort, but I would absolutely make this again next Mardi Gras!
Making the dough, proofing, and rolling it out... I used two types of cinnamon in my filling! Braids... proofed, baked, and iced! Ain't she a beauty!? My first taste of King Cake! Happy Mardi Gras! ;)
King Cake (from "Recipe Hall of Fame Dessert Cookbook") Makes 2 large pastries
Dough 1 stick plus 1 tablespoon unsalted butter 2/3 cup fat-free evaporated milk (I used regular evap. milk) 1/3 cup plus 2 tablespoons sugar 2 teaspoons salt 2 packages active dry yeast 1/3 cup warm water 4 eggs 1 tablespoon grated lemon rind (I used only 1 teaspoon) 2 tablespoons grated orange rind (I used only 1 tablespoon) 5 cups plus 1 cup all-purpose flour
In a saucepan, melt 1 stick butter, milk, 1/3 cup sugar, and salt. Cool to lukewarm. In a large mixing bowl, combine 2 tablespoons sugar, yeast, and water. Let stand until foaming, about 5-10 minutes. Beat eggs into yeast; then add milk mixture and rinds. Stir in flour, 1/2 cup at a time, reserving 1 cup of flour for kneading surface. Knead dough until smooth, about 5-10 minutes.(I put mine in a stand mixer with the dough hook on medium-low speed for about 6 minutes.) Place in large mixing bowl greased with 1 tablespoon butter, turning dough once to grease top; cover and let rise in a warm place until doubled, about 1 1/2 - 2 hours.
Filling 1 stick butter, melted 3/4 cup granulated sugar 1/2 cup dark brown sugar, packed 1 tablespoon cinnamon
Mix sugars and cinnamon; set aside. When dough has doubled, punch down and divide in half. On a floured surface, roll half into a rectangle 30 x 15. (I couldn't get mine quite this big, but I got within a few inches.) Brush with half of the melted butter and cut into 3 lengthwise strips. Sprinkle half of the sugar mixture on strips, leaving a 1-inch lengthwise strip free for sealing. Fold each strip lengthwise toward the center, sealing the seam. You will now have three 30-inch strips with sugar mixture enclosed in each. Braid the 3 strips and make a circle by joining ends. (It's a bit tricky to braid the ends together, but just start tucking and eventually you'll get it.) Repeat with other half of dough. Place each cake on a 10 x 15-inch baking sheet, cover with a damp cloth, and let rise until doubled, about 1 hour. (I covered mine with plastic wrap sprayed with nonstick spray.)
Garnish 1 cup sugar, colored (1/3 cup each of yellow, purple, and green) 1 egg, beaten 2 (3/4-inch) plastic babies or 2 beans (I was going to use an almond, but I forgot them!)
Tint sugar by mixing food coloring until desired color is reached. For purple, use equal amounts of blue and red. A food processor aids in mixing, and keeps the sugar from being too moist.
Brush each cake with beaten egg and sprinkle with colored sugars, alternating colors. (I used the egg wash, but I did not sprinkle my cakes with sugar before baking. Instead I mixed 2 cups confectioners' sugar with a bit of orange juice until I got a thick glaze. Warm that in the microwave until it is pourable and slightly warm, about 15-20 seconds. Slowly pour the glaze over the cooled cakes. Let it set for about 1 minute, then sprinkle with colored sugars.) Preheat oven to 350°. Bake 20 minutes. Remove from pan immediately so sugar will not harden; while still warm, place 1 plastic baby in each from underneath. Makes two 9x 12-inch cakes. Freezes well.
To freeze: Wrap cooled cake tightly in plastic. Before serving, remove plastic and thaw.
As some of you already know, I started a new blog called "Not Your Momma's Test Kitchen." It was supposed to be a blog where you send in recipes that you've been saving for a while but haven't gotten around to making. I would make them and show you my results, and then it would be your turn. Well, I decided it would be too much trouble, and really impractical, to have two blogs. So I'm making NYMTK a sub-chapter of this blog! Somehow, I have to figure out a way to rework this layout to include a tab to submit a recipe (like this page here on my NYMTK blog). Suggestions are welcome and much needed!
For my first NYMTK post, I took the very first e-mail submission I received. It was sent in by Andrea, and she bookmarked it from DianasDesserts.com. The recipe originally comes from "The New Food Lover's Companion 2nd Edition" by Sharon Tyler Herbst. Since petit fours are on my Top 100, I thought this was a perfect match! Reading the reviews on Dianas Desserts, I knew I was going to get one of two results. Either my petit fours would be delicious and adorable, or they'd be sickeningly sweet and fugly. Just browse through my photos below and then guess which result I got........................
Got a guess???? They were absolutely the sweetest things I've ever eaten! I know they're supposed to be quite sweet, and that is why they are portioned so small. But seriously, this was like literally dipping a spoon straight into a box of confectioners' sugar! And fugly doesn't even come close to describing them. I'm not exactly a beginner in the kitchen, and Icouldn't even make them look respectable. I think they're so sickeningly sweet because of the amount of icing that has to go on them so they're no longer see-through. The cake itself was delicious with a thin coating of the fruit glaze, and after just one coating of icing they were sweet, but just as I'd imagine a petit four to taste like. However, once they were completely coated, they became inedible. Overall, I'd say my final opinion is that petit fours just suck! Sorry I don't have better news for you, Andrea. :(
Tea Time Petit Fours (from "The New Food Lover's Companion 2nd Edition" by Sharon Tyler Herbst) Makes 2 1/2 dozen
For Cake: 1/4 cup butter or margarine, melted 1/4 cup shortening 1 cup sugar 1 teaspoon vanilla extract 1-1/3 cups all-purpose flour 2 teaspoons baking powder 1/2 teaspoon salt 2/3 cup milk 3 egg whites
For Fruit Glaze: 12 oz. apricot or raspberry preserves (or heated jelly may be used instead) 3 tbsp. water
For Icing: 9 cups confectioners' sugar 1/2 cup water 1/2 cup light corn syrup 1 teaspoon vanilla extract 1/2 teaspoon almond extract Food coloring, optional Tiny edible sugar flowers or leaves, for decorating tops of petit fours
For Cake: Preheat oven to 350 degrees F (180 C). Grease and lightly flour a 9-inch square baking pan.
In a large mixing bowl, cream the butter, shortening and sugar. Beat in the vanilla. Combine the flour, baking powder and salt; add to creamed mixture alternately with milk. In a small mixing bowl, beat egg whites until soft peaks form; gently fold into batter.
Pour batter into prepared baking pan and bake at 350 degrees F (180 C) for 20-25 minutes or until a toothpick inserted near the center comes out clean. Remove cake from oven and let cool in pan for 10 minutes. Turn cake out onto a plate or cooling rack; then chill cake in refrigerator for at least 30 minutes. (I froze mine overnight before I continued.)
Remove cake from refrigerator. Cut a thin slice off each side of chilled cake. Cut cake into 1-1/4-inch squares. Place squares 1/2 inch apart on a cooling rack over a 15 x 10 x 1-inch pan. Apply fruit glaze (See Fruit Glaze Preparation Below) evenly over tops and sides of cake squares, allowing excess to drip off. Let dry. Repeat if necessary to thoroughly coat squares. Let glaze dry completely. (I put mine in the freezer for 15 minutes.)
For Preparing The Fruit Glaze: In a medium size saucepan, heat preserves with the 3 tbsp. water on low heat. Drizzle or spread a thin layer of heated preserves over cooled tops and sides of petit fours before icing. (If using jelly, you do not need to add water to it, just heat jelly in saucepan on low heat and spread over cooled tops and sides of petit fours).
To Prepare Icing: Combine all icing ingredients in the top of a double boiler. Heat over boiling water to lukewarm. Pour icing over tops and sides of petit fours. Once they are set, they should be coated with icing again. After icing hardens, decorate tops of each petit four with a tiny edible sugar flower or leaf. (I put each piece of cake on a dipping fork over the icing bowl then poured the icing over with a large spoon.)
Storage of Petit Fours Petits Fours may be made up to 24 hours in advance. Let the icing (or if using a fondant frosting) dry completely before storing in an airtight container. Refrigerate petit fours if they contain perishable fillings and icings, such as dairy products or fresh fruit or berries. The fruit preserves or jelly used in the filling of these petit fours can go bad after 2 or 3 days because of the moisture from the wet fruit filling, so storing them in an airtight container at room temperature for more than 2 days is not advised.
Tips: 1) You can separate the icing, once it's made, into small bowls, and tint each with a different food coloring, adding color until you achieve the desired shade. 2) Icing colors that look nice for petit fours are: White, Pale Yellow, Pale Pink, Pale Blue, Pale Green or Lavender. 3) You may also drizzle melted white or dark chocolate over tops and sides of petit fours instead of using the white or tinted icing. 4) Another idea is to sandwich two of the cake squares together with the heated preserves or jelly glaze; then pour icing over the tops and sides of squares, then decorate when icing has hardened completely.
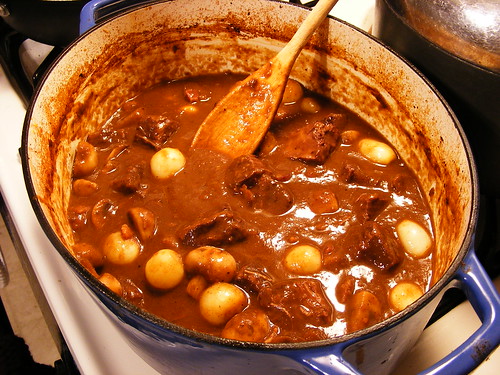
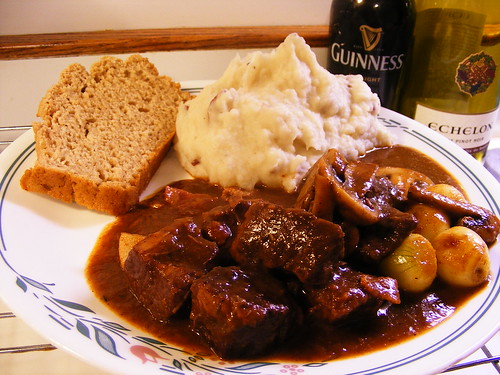
A few months ago, I won another cookbook giveaway at Kate's blog Warm Olives and Cool Cocktails. I was so excited that I won my first choice, "Bon Appetit, Y'all" by Virginia Lewis. It's been on my Amazon.com wishlist for quite some time! As a rule for her cookbook giveaways, Kate asks that we make a recipe from the cookbook within 30 days after we get it. I recently saw the movie "Julie & Julia" for the first time, and as soon as I saw the recipe for Boeuf Bourguignonne in this book, I knew that's what I wanted to make (it's a pretty important recipe in the movie!). It's basically a French version of beef stew cooked in wine. I knew it would be a time consuming recipe, but I figured with all the time and energy it would take to make it, I'd have some sort of celestial experience upon take the first bite. Sadly, that didn't happen. I don't know why, but I thought my dislike for wine would take a back seat and let me enjoy this meal. Nope! If you're not a wine lover, or if you're like me and the taste of wine makes you gag, don't kid yourself into thinking you're gonna love Boeuf Bourguignonne just because it's some fancy French recipe. But if you consider yourself a wine drinker, then by all means, set aside 4-6 hours of your time to make this dish! The beef is extremely tender, and the entire dish is packed with deep flavors.
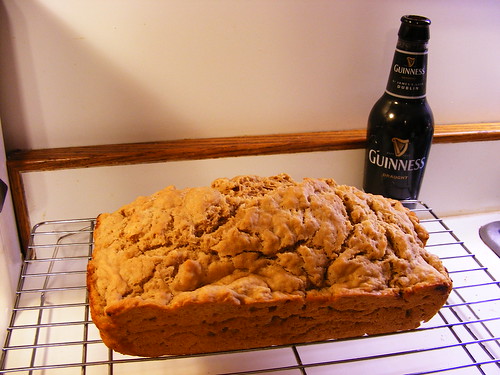
I served mine with mashed potatoes and the Stout Batter Bread that was mentioned in the cookbook as a nice accompaniment to the Boeuf Bourguignonne. By the way, if you have no idea how to pronounce that, go here and click the speakerphone symbol. It's something along the lines of "buhf Boor-geen-yahn." Anyway, the beer bread was the star of the show! It was PERFECT to sop up the sauce, and it had a nice bitterness from the Guinness. Mmmm!
Oh btw, did I mention there's even a VIDEO for this post! Yep, it's a new thing that I'll probably forget about. I'm calling it "Table Talk." Watch the clip at the end of the post for a lovely after-dinner interview. :D
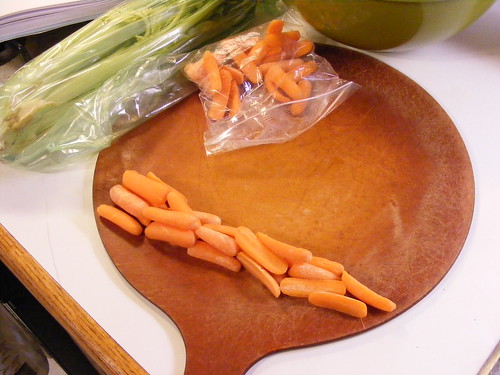
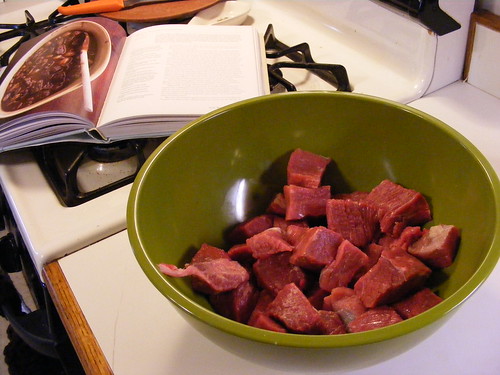
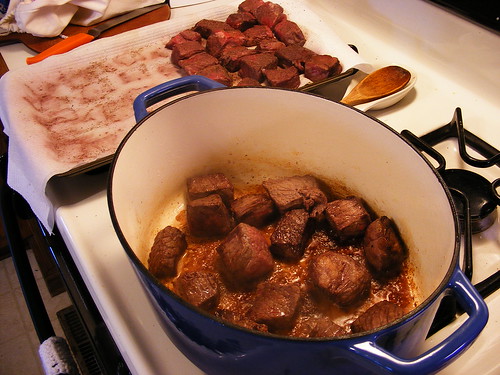
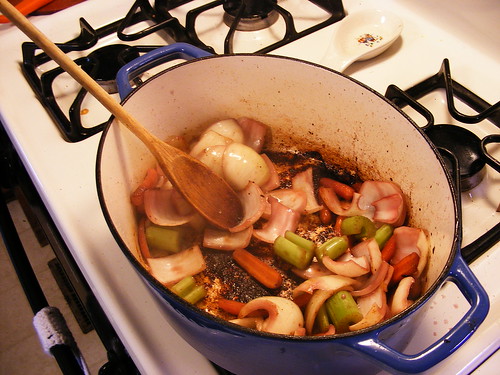
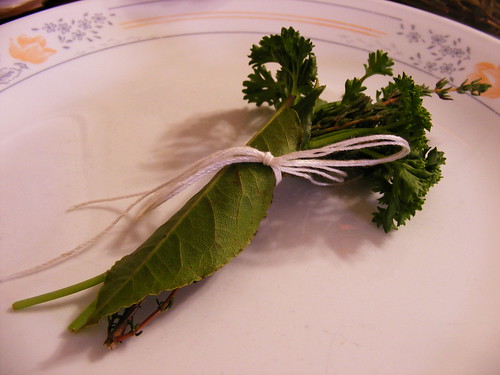
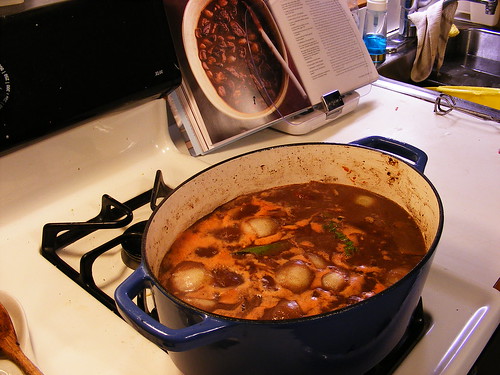
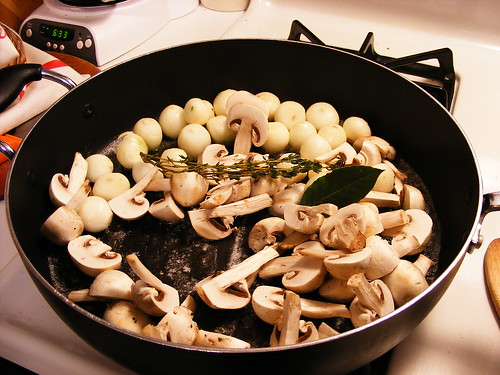
How many baby carrots does it take to make a large carrot?? Bottom round, trimmed of excess fat, and cut into cubes Meat, veggies, and wine... ready for a 7 hour chill Browning the meat Sauteing the veggies Adding the flour as a thickener My bouquet garni (I didn't have cheesecloth!) Ready for a 2 1/2 hour stay in the oven! While the stew was in the oven, I made the beer bread... And I sauteed the veggies for the "garnish" After 2 1/2 hours in the oven, it's reduced and smelling gooooood... Add the garnish, et voilà! Dinner is brought to you tonight by ALCOHOL! Woot woot!
Boeuf Bourguignonne (from “Bon Appetit, Y’all” by Virginia Willis) Serves 4 to 6
In classic French cooking, each dish has a name that indicates its precise ingredients and correct garnish. Bourguignonne is a term for dishes cooked in red wine, as some of the most famous French wines are from Bourgogne (Burgundy). These dishes are garnished with pearl onions, button mushrooms, and lardons of bacon. Never choose stew meat already in precut cubes. It's more expensive and you have no idea if you're getting, for example, leftover bits from the shoulder or rib-eye, two wildly different cuts that won't cook at the same rate.
3 pounds lean rump roast, chuck pot roast, sirloin tip, top round, or bottom round, cut into 2-inch cubes (I used bottom round, trimmed of excess fat) 1 (750-ml) bottle red wine, preferably Pinot Noir 1 carrot, cut into 1-inch pieces 1 stalk celery, cut into 1-inch pieces 1 onion, preferably Vidalia, coarsely chopped 4 slices thick-cut bacon, cut into lardoons (matchsticks) 3 tablespoons canola oil, plus more if needed Coarse salt and freshly ground black pepper 1 tablespoon all-purpose flour 2 1/2 cups homemade beef stock or low-fat, reduced-sodium beef broth (definitely use the reduced-sodium broth, as it will reduce during cooking) Bouquet garni (5 sprigs of thyme, 4 sprigs of flat-leaf parsley, 2 bay leaves, preferably fresh, 10 black peppercorns, tied together in cheesecloth) 1 tablespoon tomato paste 2 cloves garlic, finely chopped 1 tablespoon unsalted butter 24 pearl onions, trimmed and peeled 8 ounces white button mushrooms, halved or quartered if large
To marinate the beef, place the cubes in a large non-reactive bowl. Add the wine, carrot, celery, and onion. Cover and refrigerate for at least 2 hours or overnight (I marinated mine for 7 hours).
Line both a baking sheet and a large plate with paper towels.
Remove the beef from the marinade and transfer to the prepared baking sheet. Pat the meat dry with paper towels. Strain the marinade, reserving separately both the vegetables and the liquid (the liquid in one bowl, the veggies in another).
Preheat the oven to 350°F. To cook the beef, heat a large, heavy-duty Dutch oven over medium-high heat. Add the bacon and cook until the fat is rendered and the bacon is crisp, about 5 minutes. Remove the bacon with a slotted spoon to the prepared plate to drain. Pour off all but 1 tablespoon of the bacon fat from the pan. Decrease the heat to medium, add 2 tablespoons of the canola oil and heat until shimmering.
Season the beef with salt and pepper. Sear the beef in two or three batches without crowding until nicely browned on all sides, about 5 minutes; transfer to the prepared baking sheet when done (At this point, the bottom of your pot has started to develop a very dark, almost burnt-looking film. Don’t worry, you haven’t ruined your expensive Dutch oven. This is called “fond,” and it‘s pure flavor!). Add the reserved vegetables from the marinade and cook until they start to color, 5 to 7 minutes. Sprinkle on the flour and toss again to lightly coat. Cook, stirring constantly, until the flour turns brown, 2 to 3 minutes. Return the beef to the Dutch oven. Add the reserved marinade liquid and enough stock to barely cover the meat.
Add the bouquet garni, tomato paste, and garlic to the pan. Bring to a boil on high heat on the cooktop. Cover and transfer to the oven. Cook until the meat is tender, 2 1/2 to 3 hours.
Meanwhile, to make the garnish, in a large skillet, heat the remaining 1 tablespoon of oil and the butter over medium heat. Add the peeled onions, mushrooms, the remaining sprig of thyme, and the remaining bay leaf. Season with salt and pepper. Sauté until the vegetables are lightly browned and tender, 5 to 7 minutes. Set aside and keep warm.
Remove the bouquet garni from the Dutch oven and discard. Transfer the beef with a slotted spoon to a bowl. In the Dutch oven, using an immersion blender, puree the sauce and vegetables until smooth. Or, once the beef is removed, ladle the sauce and vegetables into a blender and puree until smooth a little at a time. Cook the puréed sauce over medium-high heat until the sauce coats the back of a spoon; if needed, thin with more stock to achieve this consistency (Mine was already thick, so I added about 1/2 cup of broth to thin it out). Taste and adjust for seasoning with salt and pepper. Return the beef to the sauce and turn to coat.
Remove the sprig of thyme and the bay leaf from the mushrooms and onions in the skillet. Add the sauteed mushrooms, onions, and reserved bacon to the beef and sauce. Stir to combine. Bring to a simmer over medium heat and cook until warm and the flavors marry and blend, 5 to 7 minutes. Taste and adjust for seasoning with salt and pepper. Serve immediately.
Stout Batter Bread (from “Bon Appetit, Y’all” by Virginia Willis) Makes one 9 x 5 x 3-inch loaf
Other than sharing the quickbread gene, this beer batter bread doesn't have much of a Southern heritage. For minimum effort and maximum results, it's hard to beat. This takes the phrase "dump and stir" to a whole new level. Different beers produce breads with different flavors and textures. This recipe calls for stout, producing a bread somewhat dark in color with a slightly heavy flavor. It goes well with a hearty stew such as Boeuf Bourguignonne or Old-fashioned Pot Roast. Lighter ale produces a lighter loaf and would be more appropriate with milder dishes such as Potato and Cheddar Soup.
4 tablespoons (1/2 stick) unsalted butter, melted, plus more for the loaf pan 3 cups all-purpose flour 1 tablespoon baking powder 3 tablespoons sugar 1 teaspoon fine sea salt 1 (12-ounce) bottle stout, at room temperature (I used Guinness)
Preheat the oven to 375°F. Brush one 9x5x3-inch loaf pan with some of the butter.
In a bowl, combine the flour, baking powder, sugar, and salt. Add the beer and 2 tablespoons of the remaining melted butter, stirring just until combined. (The batter will be somewhat lumpy.)
Pour the batter into the prepared loaf pan and drizzle with the remaining 2 tablespoons of melted butter. Bake until a skewer inserted into the center comes out clean, 35 to 40 minutes (If you're using this bread to sop up gravy or soup, it‘s okay to leave it in for the full 40 minutes. I‘m a freak about taking things out early, so my bread was just slightly on the gummy side). Transfer to a wire rack to cool slightly, then invert onto the rack to cool until warm. Serve warm or at room temperature.

 ...or Melt-In-Your-Mouth Pound Cake ...or White Velvet Pound Cake ...or The Best D@#% Pound Cake I've Ever Eaten! Any of these could be proper titles for this blog post. Seriously, this is THE pound cake to end all pound cakes. It's moist, rich, dense, flavorful, silky, delicious! The texture alone is what sold me on this pound cake recipe. It has no chemical leaveners, so it relies on whipping the batter up into a fluffy, sweet cloud in order for it to get a nice lift in the oven. And since cake flour is used instead of all purpose flour, each bite feels like silk on your tongue. It's pretty darn incredible! Tomorrow I'm going to get some juicy strawberries and make strawberry shortcake with it. Heck, I might even get a little crazy and use it to make a nutella-banana panini à la Amanda of Is This Thing On? Either way, I'm going to be in heaven for the next couple of days. And I can say that with confidence because I made TWO of these suckers!!


 Look at that crumb... yummy!