Flour Child Bakery opens in Virginia Beach!

My mom and I just opened a bakery in Virginia Beach!! "Like" us to stay updated! If you care to read our blog, it's flourchildbakery.blogspot.com.


Showing posts with label dinner. Show all posts

Friday, February 5, 2010

Boeuf Bourguignonne & Stout Batter Bread

A few months ago, I won another cookbook giveaway at Kate's blog Warm Olives and Cool Cocktails. I was so excited that I won my first choice, "Bon Appetit, Y'all" by Virginia Lewis. It's been on my Amazon.com wishlist for quite some time! As a rule for her cookbook giveaways, Kate asks that we make a recipe from the cookbook within 30 days after we get it. I recently saw the movie "Julie & Julia" for the first time, and as soon as I saw the recipe for Boeuf Bourguignonne in this book, I knew that's what I wanted to make (it's a pretty important recipe in the movie!). It's basically a French version of beef stew cooked in wine. I knew it would be a time consuming recipe, but I figured with all the time and energy it would take to make it, I'd have some sort of celestial experience upon take the first bite. Sadly, that didn't happen. I don't know why, but I thought my dislike for wine would take a back seat and let me enjoy this meal. Nope! If you're not a wine lover, or if you're like me and the taste of wine makes you gag, don't kid yourself into thinking you're gonna love Boeuf Bourguignonne just because it's some fancy French recipe. But if you consider yourself a wine drinker, then by all means, set aside 4-6 hours of your time to make this dish! The beef is extremely tender, and the entire dish is packed with deep flavors.

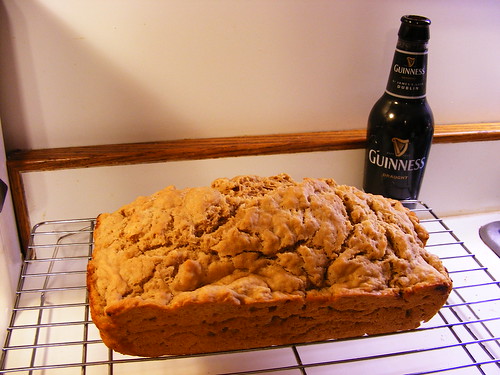
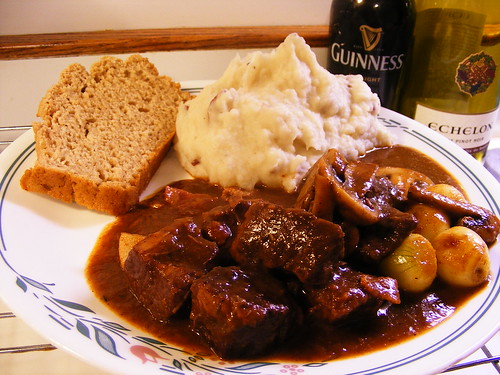
I served mine with mashed potatoes and the Stout Batter Bread that was mentioned in the cookbook as a nice accompaniment to the Boeuf Bourguignonne. By the way, if you have no idea how to pronounce that, go here and click the speakerphone symbol. It's something along the lines of "buhf Boor-geen-yahn." Anyway, the beer bread was the star of the show! It was PERFECT to sop up the sauce, and it had a nice bitterness from the Guinness. Mmmm!

Oh btw, did I mention there's even a VIDEO for this post! Yep, it's a new thing that I'll probably forget about. I'm calling it "Table Talk." Watch the clip at the end of the post for a lovely after-dinner interview. :D

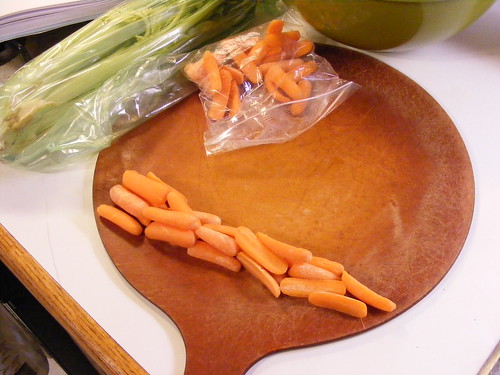
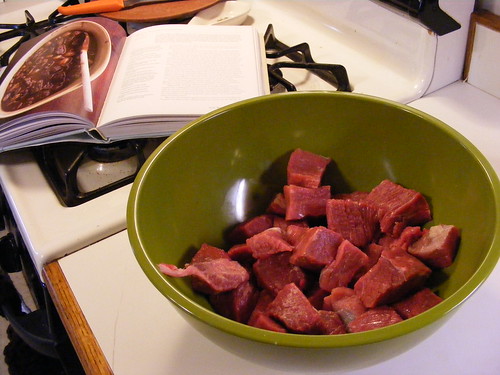
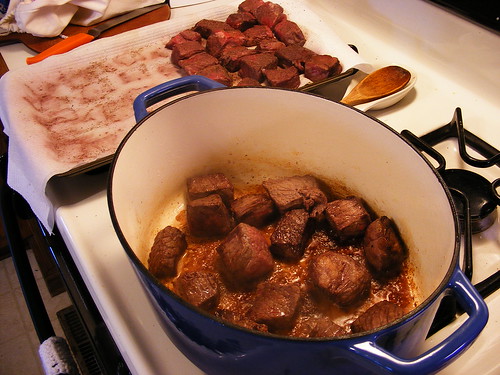
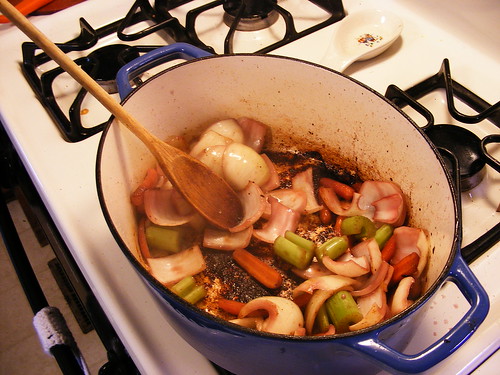
How many baby carrots does it take to make a large carrot?? Bottom round, trimmed of excess fat, and cut into cubes Meat, veggies, and wine... ready for a 7 hour chill Browning the meat Sauteing the veggies Adding the flour as a thickener
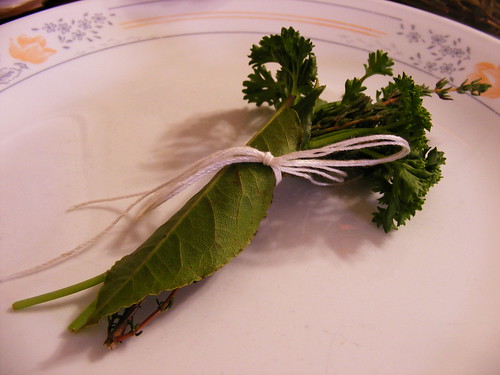
My bouquet garni (I didn't have cheesecloth!)
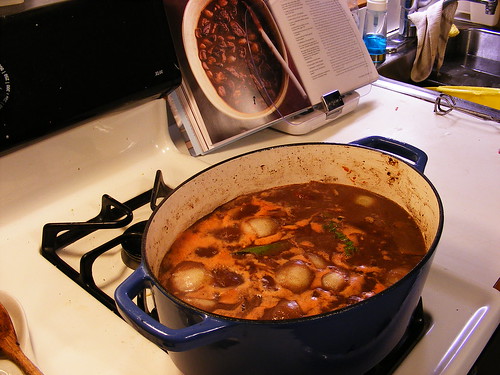
Ready for a 2 1/2 hour stay in the oven!
While the stew was in the oven, I made the beer bread...
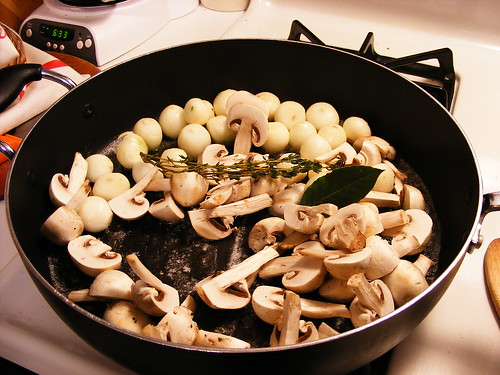
And I sauteed the veggies for the "garnish"
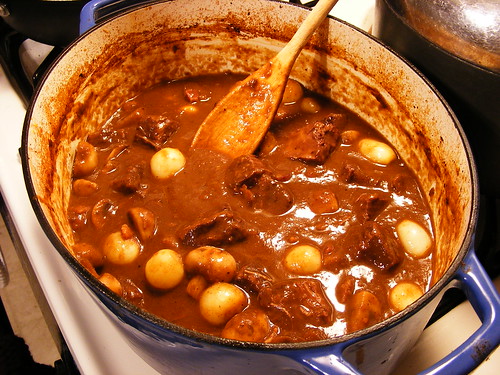
After 2 1/2 hours in the oven, it's reduced and smelling gooooood...
Add the garnish, et voilà!
Dinner is brought to you tonight by ALCOHOL! Woot woot!

Boeuf Bourguignonne (from “Bon Appetit, Y’all” by Virginia Willis)
Serves 4 to 6
In classic French cooking, each dish has a name that indicates its precise ingredients and correct garnish. Bourguignonne is a term for dishes cooked in red wine, as some of the most famous French wines are from Bourgogne (Burgundy). These dishes are garnished with pearl onions, button mushrooms, and lardons of bacon. Never choose stew meat already in precut cubes. It's more expensive and you have no idea if you're getting, for example, leftover bits from the shoulder or rib-eye, two wildly different cuts that won't cook at the same rate.
3 pounds lean rump roast, chuck pot roast, sirloin tip, top round, or bottom round, cut into 2-inch cubes (I used bottom round, trimmed of excess fat)
1 (750-ml) bottle red wine, preferably Pinot Noir
1 carrot, cut into 1-inch pieces
1 stalk celery, cut into 1-inch pieces
1 onion, preferably Vidalia, coarsely chopped
4 slices thick-cut bacon, cut into lardoons (matchsticks)
3 tablespoons canola oil, plus more if needed
Coarse salt and freshly ground black pepper
1 tablespoon all-purpose flour
2 1/2 cups homemade beef stock or low-fat, reduced-sodium beef broth (definitely use the reduced-sodium broth, as it will reduce during cooking)
Bouquet garni (5 sprigs of thyme, 4 sprigs of flat-leaf parsley, 2 bay leaves, preferably fresh, 10 black peppercorns, tied together in cheesecloth)
1 tablespoon tomato paste
2 cloves garlic, finely chopped
1 tablespoon unsalted butter
24 pearl onions, trimmed and peeled
8 ounces white button mushrooms, halved or quartered if large

To marinate the beef, place the cubes in a large non-reactive bowl. Add the wine, carrot, celery, and onion. Cover and refrigerate for at least 2 hours or overnight (I marinated mine for 7 hours).

Line both a baking sheet and a large plate with paper towels.

Remove the beef from the marinade and transfer to the prepared baking sheet. Pat the meat dry with paper towels. Strain the marinade, reserving separately both the vegetables and the liquid (the liquid in one bowl, the veggies in another).

Preheat the oven to 350°F. To cook the beef, heat a large, heavy-duty Dutch oven over medium-high heat. Add the bacon and cook until the fat is rendered and the bacon is crisp, about 5 minutes. Remove the bacon with a slotted spoon to the prepared plate to drain. Pour off all but 1 tablespoon of the bacon fat from the pan. Decrease the heat to medium, add 2 tablespoons of the canola oil and heat until shimmering.

Season the beef with salt and pepper. Sear the beef in two or three batches without crowding until nicely browned on all sides, about 5 minutes; transfer to the prepared baking sheet when done (At this point, the bottom of your pot has started to develop a very dark, almost burnt-looking film. Don’t worry, you haven’t ruined your expensive Dutch oven. This is called “fond,” and it‘s pure flavor!). Add the reserved vegetables from the marinade and cook until they start to color, 5 to 7 minutes. Sprinkle on the flour and toss again to lightly coat. Cook, stirring constantly, until the flour turns brown, 2 to 3 minutes. Return the beef to the Dutch oven. Add the reserved marinade liquid and enough stock to barely cover the meat.

Add the bouquet garni, tomato paste, and garlic to the pan. Bring to a boil on high heat on the cooktop. Cover and transfer to the oven. Cook until the meat is tender, 2 1/2 to 3 hours.

Meanwhile, to make the garnish, in a large skillet, heat the remaining 1 tablespoon of oil and the butter over medium heat. Add the peeled onions, mushrooms, the remaining sprig of thyme, and the remaining bay leaf. Season with salt and pepper. Sauté until the vegetables are lightly browned and tender, 5 to 7 minutes. Set aside and keep warm.

Remove the bouquet garni from the Dutch oven and discard. Transfer the beef with a slotted spoon to a bowl. In the Dutch oven, using an immersion blender, puree the sauce and vegetables until smooth. Or, once the beef is removed, ladle the sauce and vegetables into a blender and puree until smooth a little at a time. Cook the puréed sauce over medium-high heat until the sauce coats the back of a spoon; if needed, thin with more stock to achieve this consistency (Mine was already thick, so I added about 1/2 cup of broth to thin it out). Taste and adjust for seasoning with salt and pepper. Return the beef to the sauce and turn to coat.

Remove the sprig of thyme and the bay leaf from the mushrooms and onions in the skillet. Add the sauteed mushrooms, onions, and reserved bacon to the beef and sauce. Stir to combine. Bring to a simmer over medium heat and cook until warm and the flavors marry and blend, 5 to 7 minutes. Taste and adjust for seasoning with salt and pepper. Serve immediately.


Stout Batter Bread (from “Bon Appetit, Y’all” by Virginia Willis)
Makes one 9 x 5 x 3-inch loaf
Other than sharing the quickbread gene, this beer batter bread doesn't have much of a Southern heritage. For minimum effort and maximum results, it's hard to beat. This takes the phrase "dump and stir" to a whole new level. Different beers produce breads with different flavors and textures. This recipe calls for stout, producing a bread somewhat dark in color with a slightly heavy flavor. It goes well with a hearty stew such as Boeuf Bourguignonne or Old-fashioned Pot Roast. Lighter ale produces a lighter loaf and would be more appropriate with milder dishes such as Potato and Cheddar Soup.
4 tablespoons (1/2 stick) unsalted butter, melted, plus more for the loaf pan
3 cups all-purpose flour
1 tablespoon baking powder
3 tablespoons sugar
1 teaspoon fine sea salt
1 (12-ounce) bottle stout, at room temperature (I used Guinness)

Preheat the oven to 375°F. Brush one 9x5x3-inch loaf pan with some of the butter.

In a bowl, combine the flour, baking powder, sugar, and salt. Add the beer and 2 tablespoons of the remaining melted butter, stirring just until combined. (The batter will be somewhat lumpy.)

Pour the batter into the prepared loaf pan and drizzle with the remaining 2 tablespoons of melted butter. Bake until a skewer inserted into the center comes out clean, 35 to 40 minutes (If you're using this bread to sop up gravy or soup, it‘s okay to leave it in for the full 40 minutes. I‘m a freak about taking things out early, so my bread was just slightly on the gummy side). Transfer to a wire rack to cool slightly, then invert onto the rack to cool until warm. Serve warm or at room temperature.

Thursday, May 21, 2009

"Bubby's" Asparagus-Cheddar Quiche

A few weeks ago, I picked up Bubby's Homemade Pies at Ollies for only $9.99! This book has been on my Amazon wishlist for quite sometime, so I was super excited! If you live in near Tribeca or Brooklyn in NY, you probably know all about Bubby's Pie Company. I live in VA, so the closest I'll ever get to one of "Bubby's" pies is if I make one myself! The first pie recipe I chose is actually a quiche. It's asparagus season... not to mention Asparagus Month AND Egg Month here in the U.S.! Asparagus is super cheap right now, and Josh and I love it. This recipe was great! Slightly salty in my opinion, but nothing that couldn't be fixed next time around. My parents went gaga over it. My mom came into my room with her mouth so full she could barely speak. She gave it two thumbs up!

The only advice I have to give about this recipe is about the baking time. My oven usually cooks faster than most recipes, so I was surprised when it took almost 50 minutes for my quiche to fully bake through. The recipe warns against over baking, so I was afraid to keep baking it. I took it out while it was still very wobbly. I let it cool for the suggested 20 minutes, and when I went to slice it the center was still very wet. I preheated the oven again, this time to 375°F. I let it bake for 10 more minutes. I'd say the quiche is done when the top starts to turn brown and a knife inserted near the center comes out with none of the wet egg mixture on it. I only let it cool for 10 minutes this time, and it was perfectly set when I sliced it. The melted and cooled cheese on top makes this quiche hard to slice neatly. Hence why there are no pictures of the sliced quiche. It wasn't pretty! ;D

I love the feel of making pie pastry by hand, but a food processor is just so quick and simple! After pulsing a few times...
After adding the water the dough will still look somewhat dry, but you will should be able to form it into a disk without it crumbling apart. This picture is after I let it rest in the refrigerator.
Roll it out to about 12 inches and trim it. Roll it a little larger if you want a crimped edge on your pie.
I like to roll over mine with the rolling pin to cut off the excess and sort of "seal" it to the pie plate.
Like my pie weights? Yeah, those are pinto beans!
In retrospect, I should've par-baked this a little longer. The bottom was still soggy after I baked the quiche.
For the quiche, saute some chopped onions.
Blanch some asparagus.
Dress it all up and get it ready for the oven!
Tada! Mmm... look at that melty cheese! (Btw, this picture was taken when I took the quiche out before it was done (oops!)... It was slightly more brown on top when it was finally finished.)
ASPARAGUS-CHEDDAR QUICHE (from Bubby’s Homemade Pies by Ron Silver and Jen Bervin)
MAKES ONE 9-INCH SINGLE-CRUST PIE
“This is a light luncheon quiche to showcase the pencil-thin new spring asparagus.”

Pastry for a 9-inch single-crust pie, par-baked and cooled in pie tin (recipe follows)
1 1/2 pounds asparagus, root ends snapped off
1 1/2 tablespoons unsalted butter
1 1/2 cups finely diced yellow onions (‘tis the season to use Vidalia!)
1 cup heavy cream
2 large eggs, lightly beaten
1 teaspoon salt (I'd reduce this to 3/4 teaspoon next time)
1/2 teaspoon freshly ground black pepper
Pinch ground nutmeg
2 cups grated sharp white Cheddar cheese, divided

To par-bake the crust: Refrigerate the fully formed, crimped, uncooked crust for at least 20 minutes. Before baking, dock the bottom of the entire crust with a fork. Line the inside of the crust with parchment or foil and fill it with dried beans or pie weights, spreading them evenly all the way up to the top edge. Bake at 450° F for 15 to 20 minutes, or until the edge looks blonde and lightly blistered. The bottom of the crust will look partially cooked and there may still be some translucency to the dough. Carefully lift out the liner and weights. Cool the crust completely on a rack or trivet.

Blanch the asparagus in salted boiling water until tender (This only takes about 1 minute). Drain it and shock it in cold water to stop the cooking process. Set aside to cool and dry off.

Melt the butter in a medium skillet and sauté the onions until golden; remove from the heat. Whisk together the cream, eggs, salt, pepper, and nutmeg in a medium bowl and add the onions.

Preheat the oven to 350°F.

Line up the asparagus by the tips and cut off the tips whole. Slice the rest of the stalks into ¼-inch pieces. Put the asparagus in the bowl with the eggs and 1 ½ cups of the cheese. Mix well and pour into the pie shell. Arrange the tips concentrically on top and sprinkle with the remaining ½ cup cheese.

Bake on a lipped baking sheet for about 30 minutes, or until the center is set and jiggles slightly when shaken gently. Do not overbake. (My oven usually cooks faster than most recipes, so I was surprised when it took a lot longer for my quiche to fully bake through (about 45 minutes total). It’s done when the top starts to turn brown and a knife inserted near the center comes out with none of the egg mixture on it.)

Cool the quiche on a cooling rack for at least 20 minutes before cutting. Serve warm or at room temperature. Store covered in the refrigerator for up to 2 days.


BASIC BUTTER AND SHORTENING PASTRY PIE DOUGH
“The butter gives this crust flavor and the shortening makes the dough a little easier to work with because of its higher melting temperature. It's an appealing choice for economy and convenience, and its forgiving nature makes it an easy dough to work with in production baking. This dough is a good choice for fried pies because it holds up so well and has good buttery flavor.”
8- TO 10-INCH SINGLE CRUST
4 to 5 tablespoons ice cold water
1 1/2 cups all-purpose flour
1/4 teaspoon salt
5 tablespoons cold unsalted butter
3 tablespoons cold shortening

8- TO 10-INCH DOUBLE CRUST OR 12-INCH SINGLE CRUST
5 to 6 tablespoons ice cold water
2 cups all-purpose flour
1/4 teaspoon salt
7 tablespoons cold unsalted butter
4 tablespoons cold shortening

12-INCH DOUBLE CRUST
1/2 cup ice cold water
3 cups all-purpose flour
1/2 teaspoon salt
10 tablespoons cold unsalted butter
6 tablespoons cold shortening

Measure out the flour (unsifted) by leveling off dry measuring cups, and add the flour to large bowl. Add the salt to the flour and give it a quick stir to combine evenly.

Use cold butter, measure out the amount you need, and then coat the cold, solid stick with the flour in the bowl. Using a dough scraper or a long butcher knife, cut the butter lengthwise in half, and then lengthwise in quarters, coating each newly cut side with flour as you go. Dice the butter into 1/4-inch cubes (or 1-inch sticks if using a food processor). Break up any pieces that stick together and toss them all to coat them with flour. To use lard or shortening, chop it into 1/4-inch pieces (1-inch pieces for food processor method) and add them to the flour. Break up any pieces that stick together and toss them all to coat them with flour. (If it is a warm day, chill this mixture briefly in the freezer before continuing.)

HAND METHOD: Using a pastry cutter, press the blades through the mixture, bearing down repeatedly like you would to mash potatoes. Repeat this gesture until the largest pieces of fat are the size of shelling peas and the smallest are the size of lentils (none smaller). Do not get overenthusiastic here: this size range makes for excellent flakiness. Re-chill if necessary.

FOOD PROCESSOR METHOD: Add the flour, salt, and butter mixture to the food processor and pulse it a few times. Do not use the continuous ON setting for pastry. To get the fat to cut in evenly you must stop and angle the entire food processor to give its contents a jostle by shaking and tilting it every couple of pulses. Pulse the mixture until the larger fat pieces are the size of shelling peas and the smallest fat pieces are the size of lentils. Do not overmix. Watch closely-it typically takes less than 10 quick pulses to get there. If you have a few bigger chunks of butter in a mixture that is otherwise perfect, dump the mixture into a large bowl and cut the bigger chunks down to size by hand with a pastry cutter so that the whole mixture remains consistent for flakiness. Transfer the fat and flour mixture to a bowl and chill it. Do not use the food processor to add the water to a pastry crust. Always mix in the water by hand.

When adding the water, begin with a fully chilled flour and fat mixture and ice cold water. Be judicious, even stingy, with the water. Do not add all the water at once; it must be dispersed into the mixture incrementally. Add water two or three tablespoons at first, quickly tossing the mixture with your hands after each addition with light upward motion to distribute the water evenly throughout it. Work the dough as little as possible.

Continue adding little bits of water at a time. When there are no floury bits anymore—just little comet like cobbles that don't quite cohere—slow down and sprinkle or flick water in at this point. One drop can make the difference and bring it all together. The balance can shift quickly from crumbly to wet. To test the dough for consistency, lightly pat together some dough the size of a tennis ball. If the ball crumbles apart or has lots of dry looking cracks in it, the dough is still too dry; let it break apart. Add a drop or two of water to the outside of the ball and work it just a little. If it holds and feels firm and supple, mop up any remaining crumbs, with the ball—if they pick up easily, the dough is probably wet enough. If they fall back into the bowl, you might need a touch more water. The pastry should be just a little bit tacky when you touch it.

Wet dough may seem easier to work, but because the extra water overdevelops the gluten it makes a really tough crust. If your pie dough is stretchy (glutinous) and quickly retracts when you roll it out, chances are you have added more water than you need and your pastry is overworked. If your dough is quite sticky, soft, and wet, it is better to pitch it and start over.

Dough can feel like it's holding together because the butter is melting. If at any point the dough ceases to feel cool to the touch or the butter pieces feel melty, soft, and warm, put the whole mixture in the freezer until it's cooled down again—about 10 minutes. It's impossible to gauge the water ratio accurately if the fat is melting into the flour.

If you're making a single crust, shape the dough into one round ball with your hands. If you're making a double crust, divide the dough into slightly uneven halves and shape each half into a ball—the larger of which will be for the bottom crust, the smaller ball for the top. Cover each ball tightly with plastic wrap and refrigerate it for at least half an hour to relax and slow the gluten development and re-chill the fat. In practical terms, this cold rest makes the dough easier to roll out.

Tuesday, November 18, 2008

HTEAC Does Dinner: Loaded Baked Potato Pizza

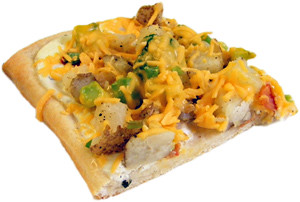
Josh and I were watching Food Network on Sunday, and they were showing the 2008 Pillsbury Bake-Off. One of the contestants being followed by FN was a woman making Loaded Baked Potato Pizza. The whole time she was saying how no one thought it would be good. Her own husband thought it sounded weird. Well, Josh had other opinions. Loaded baked potato + pizza... How could life get any better for him!?! So he convinced me to try it for dinner. We went out and bought the 3 groceries we didn't already have to make it. The whole thing came together in less than 15 minutes. It didn't take long to cook. Before I knew it, my mind was changed about this baked potato pizza idea. This stuff is great! Josh ate 3 pieces! I only had one... trying to save room for Pumpkin Cream Cheese Pie (recipe coming soon!). I even took a piece of leftover pizza to work today. Sooooo yummy! If you love loaded baked potatoes and pizza... even if you don't love pizza... TRY THIS! I swear you'll love it, unless you're on a diet (weirdo).

Recipe from FoodNetwork.com

Loaded Baked Potato Pizza
Serves 6

1 can (13.8 oz) Pillsbury(r) refrigerated classic pizza crust
1 medium white potato
1 tablespoon CRISCO(r) Pure Olive Oil (We used butter)
1/4 teaspoon salt
1/4 teaspoon pepper
1 box (10 oz) Green Giant(r)
frozen broccoli and cheese sauce
2/3 cup sour cream
1 tablespoon ranch
dressing
1 cup shredded Colby-Monterey Jack cheese blend (4 oz) (We used cheddar)
5 slices cooked bacon, coarsely chopped
1 small tomato, seeded, chopped (1/2 cup) (We omitted this... who eats tomatoes on their baked potato?)
2 medium green onions, chopped (2 tablespoons)

Directions
Heat oven to 375 degrees F. Spray large cookie sheet with CRISCO(r) Original No-Stick Cooking Spray (or butter). Unroll pizza crust dough on cookie sheet; press dough into 13x9-inch rectangle. Bake 10 to 13 minutes or until crust is light golden brown. Remove from oven; set aside.
Meanwhile, pierce potato with fork; place on microwavable paper towel in microwave oven. Microwave 4 to 5 minutes, turning once, until tender. Cover; let stand 5 minutes. When potato is cool enough to handle, peel potato and cut into 1/4-inch cubes (1 cup). In small bowl, mix potato, oil, salt and pepper; set aside.
Cook broccoli in microwave as directed on box. Empty from pouch into another small bowl to cool slightly; set aside.
In another small bowl, mix sour cream and ranch dressing. Spread mixture over pizza crust to within 1/2-inch of edges of crust. Sprinkle 1/2 cup of the cheese evenly over sour cream mixture. Sprinkle with bacon.
Spread broccoli mixture and potato mixture evenly over bacon. Sprinkle tomato, onions and remaining 1/2 cup cheese evenly over potato mixture.
Bake 15 to 22 minutes longer or until crust is golden brown and cheese is melted. Let stand 5 minutes before cutting. (We only baked it for 10 minutes longer, because the crust was getting too brown.)

Saturday, July 5, 2008

HTEAC Does Dinner: Turkey & Veggie Lasagna

It's time for another installment of "HTEAC Does Dinner"! I know it seems like I only cook dinner once every few months. But the truth is I'm just too lazy to take pictures of the dinner making process that takes place in my kitchen a few nights a week. Most of the time I'm experimenting with recipes I find online, so I'm never too sure how they're gonna turn out. This time I made up my own recipe. Ground turkey was on sale, so I bought all they had at the grocery store and put it in the freezer. The fabulous things about cooking with ground turkey are that it's better for you than ground beef, but most importantly you can't tell its turkey! I hate turkey. The only time I'll ever eat turkey is on Thanksgiving when its swimming in my Grandma's gravy. But don't even talk to me about a turkey sandwich. However, I'll replace ground beef with ground turkey any day! I knew I wanted to use it in lasagna. Let me say now, for the record, I'll never make lasagna any other way than this! Normally I wouldn't brag, but I did give myself a nice pat on the back. The boyfriend and the family enjoyed it also. Here's the recipe with pictures.

Turkey & Veggie Lasagna
8-12 servings

1 tablespoon olive oil
1 tablespoon butter or margarine
1/2 green bell pepper
1 medium carrot
1 small onion
1 medium zucchini
4 oz. portabella mushrooms
10 oz. frozen chopped spinach, thawed
14.5 oz. can Italian diced tomatoes
1 teaspoon minced garlic
1/2 teaspoon each, salt & black pepper
26 oz. can spaghetti sauce
8 oz. can tomato sauce
1 1/4 lbs. lean ground turkey
1/2 teaspoon Italian seasoning
1/8 teaspoon garlic salt
1 lb. lasagna noodles
15 oz. part skim ricotta cheese
8 to 16 oz. part skim shredded mozzarella, depending how cheesy you want it (I used 8)
1/2 cup parmesan cheese
8 slices Swiss cheese

Chop bell pepper, carrot, and onion about the same size. In a pan over medium heat, sauté pepper, carrot, and onion in olive oil and butter until onion is soft, about 5 minutes.

Meanwhile, chop zucchini and mushrooms into bite sized pieces. Add zucchini, mushrooms, spinach, and diced tomatoes, minced garlic, salt, and pepper to sauté pan. Stir until heated through. Tranfer vegetables to a large sauce pot. Stir in spaghetti sauce (I used Hunts Zesty & Spicy sauce) and tomato sauce. Cover and reduce heat to low.

Bring a large pot of water to a boil. Add lasagna noodles and salt (if desired) and cook until al dente (soft but still has a bite). Drain noodles and cool in a bowl of ice water. Pat noodles dry with a lint-free dish cloth.

While waiting for the water to boil, combine the turkey, Italian seasoning and garlic salt in the sauté pan. Cook over medium heat, stirring often, until turkey is browned. Add turkey to the sauce pot, and continue cooking over low heat, stirring occasionally.

Preheat oven to 375 degrees F.

Spray a 10x14 casserole dish with cooking spray. Spread a thin layer of sauce in the bottom of the dish, about 1 cup. Reserve 2 cups of sauce for spreading on the top. Layer lasagna noodles slightly overlapping. Spread 1/3 of the ricotta on the noodles. Sprinkle with a bit of parmesan cheese, 1/4 of the mozzarella, and 4 slices of Swiss cheese (cut in half). Spread 1 cup of sauce over the cheese. Repeat with noodles, cheese, and sauce until you have 4 layers of noodles and 3 layers of filling (with no Swiss cheese on the 3rd layer). After the 4th layer of noodles, spread the remaining 2 cups of sauce and the remaining mozzarella. Sprinkle with remaining parmesan cheese.

(You can see I referenced Joy of Cooking to find out the proper lasagna layering technique!)

Bake for 40-45 minutes or until well brown and bubbly. Remove from oven and let cool for 15 minutes before slicing.

Friday, February 22, 2008

HTEAC Does Dinner - Chicken Enchiladas & Spanish Rice

Hey guess what! Not only do I know my way around an oven, I'm pretty crafty with a stove too!

My boyfriend and I love to cook together. ...Well, I do most of the cooking and he likes eating it and washing the dishes. Did I hit the jackpot or what? Anyway, we cook a nice (meaning more than a box of mac & cheese) dinner at my house 2 or 3 times a week, so I thought why not post those recipes on my blog as well? I mean people gotta eat more than just cupcakes right? (Not because we want to, but because there's only a minimal amount of vital nutrients in a cupcake.)

Last night, Josh had the brilliant idea of making chicken enchiladas. I browsed Allrecipes.com for the highest rated recipes that included the most amount of ingredients I already had to make chicken enchiladas and spanich rice. I chose "Chicken Enchiladas I" and "Spanish Rice II" and made slight changes to both. You can click those for the original recipes, but I'm going to post my modified recipes here.

Chicken Enchiladas
Serves 8
(about 5 in my family, ahaha)

INGREDIENTS
3 (about 1-2 lbs) skinless, boneless chicken breasts
1 onion, chopped
1/2 green bell pepper, chopped
1 clove garlic, minced
1 cup sour cream
1 cup shredded cheddar cheese, plus extra for the top
1/2 teaspoon dried oregano
1/2 teaspoon ground black pepper
1 teaspoon salt
1 tablespoon chili powder
1/2 teaspoon ground red pepper or cayenne pepper (optional)
3/4 cup (about a handful) fresh cilantro, chopped
1 - 15 ounce can tomato sauce
8 - 10 inch flour tortillas
1 - 12 ounce jar enchilada sauce

DIRECTIONS
Preheat oven to 350 degrees F (175 degrees C).
In a medium, non-stick skillet over medium heat, cook chicken until no longer pink and juices run clear. Remove chicken from pan and shred or cut into small pieces.

Meanwhile, saute onion, green pepper and garlic in the same pan. Return chicken to the skillet with sauteed vegetables.

Add the sour cream, cheddar cheese, oregano, ground black pepper, chili powder, cayenne pepper, and salt. Heat until cheese melts. Stir in cilantro and tomato sauce.


Roll even amounts of the mixture in the tortillas. Arrange in a 9x13 inch baking dish. Cover with sauce and cheddar cheese. Bake uncovered in the preheated oven 20 minutes. Cool for a few minutes before serving.

Spanish Rice
Serves 6-8


INGREDIENTS
2 tablespoons vegetable oil
1 onion, chopped
1/2 green bell pepper, chopped
1 cup uncooked white rice
2 cups chicken stock or broth
1 - 10 ounce can diced tomatoes and green chiles
2 teaspoons chili powder
1 1/2 teaspoons salt

DIRECTIONS
Heat oil in a deep skillet over medium heat. Saute onion and bell pepper until tender. Add rice and continue sauteing until rice is browned.
Stir in chicken stock, tomatoes, chili powder and salt. Cover, and simmer for 20-30 minutes, or until rice is cooked and liquid is absorbed.

It's not very pretty, but it was delicious! :)

Saturday, November 17, 2007

HTEAC Does Dinner - Potato & Corn Soup

Whoa! Am I straying away from cupcakes or what? Hopefully, no one will mind... But lately I've been cooking A LOT. This is by far my favorite recipe from Mrs. Paula Deen! I've made it 3 times, and everyone who's tried it has asked for it repeatedly! It's hearty and light at the same time. And it's best enjoyed in front of a warm fire!

I had to include this photo I took of the chiminea on our back porch. My dad bought this stuff that's like sand you sprinkle into the fire. It makes the fire burn in the beautiful colors!

Recipe from foodnetwork.com

Potato & Corn Soup
Serves 8-10

1/2 stick butter

1 small onion, diced
2 medium carrots, diced about the same size as the onion
2 tablespoons all-purpose flour
8 medium russet potatoes, peeled and cubed
4 cups 1% milk
2 chicken bouillon cubes, dissolved in 1/2 cup hot milk
1 cup half-and-half
1 teaspoon salt
1/4 teaspoon pepper
2 cans whole kernel corn
crumbled bacon bits, for garnish
grated sharp Cheddar, for garnish

In a 4-quart saucepan, melt the butter and saute the onion and carrots until both are slightly tender, about 5 minutes. Whisk in the flour and cook for 1 minute.
Add the potatoes, milk, and dissolved bouillon cubes. Cook over medium heat for 15 minutes, until the potatoes are very soft and some of them have begun to dissolve into mush. Add the half-and-half, salt, pepper, and corn. Return soup to a boil, then remove from heat.
Serve soup sprinkled with bacon bits and grated cheese.