


Thanks, Santa (AKA mom, dad, boyfriend, brother, aunts, uncles, cousins, etc...)! This was truly the best Christmas ever! <3 <3 <3

 Cookie dough for KAF's Crunchy Cookies, Thin & Crispy Cookies, and Thick & Chewy Cookies...


 The winners of last week's poll with 270 votes were Chocolate Peppermint Cupcakes! These are very different from the chocolate mint cupcakes I've done before. Instead of being flavored with peppermint extract, these cupcakes get their minty kick from peppermint tea! The recipe comes from Cupcakes Galore by Gail Wagman. The cupcakes are good. They're moist and chocolatey with a hint of peppermint. You don't notice the tea flavor at first, but if you knew it was there you could definitely pick it out. The frosting that was supposed to go with them was a peppermint cream cheese frosting. But I was in the mood for some Swiss meringue buttercream. Peppermint SMBC is Josh's FAVORITE, so he was very happy that he showed up to my house just as I was frosting the cupcakes. He kept asking if eating all that frosting was bad for him. Hahaha, I told him it might be unhealthy but there was no way it could be bad! :D I garnished the cupcakes with some crushed up candy canes. I didn't eat a cupcake with the frosting and garnish, but I tasted them separately and they were both great. Everyone at Wing Night loved them too!
 Ingredients... Aren't the egg whites pretty???
 Melt the tea, butter, sugar, and chocolate together.
 Heat until smooth and whisk in the egg yolks.
 The finished batter ready to go!
 They look like Christmas!
 Wednesday evening I cranked out six, count 'em, SIX pie crusts! I was quite proud of myself. One lesson I definitely learned is to make sure the pieces of butter in the pie crust are small! Some of my pieces were as big as [small] marbles. They melted while baking resulting in holes in the crust and a burnt butter smell in the oven. No good at all! Don't stop cutting in the butter until the biggest lumps are the size of peas.
 Thursday I got started on the baking. The first pie crust I rolled out was picture perfect. That is, until it went into the oven to be pre-baked. The instructions said just to prick it with a fork, didn't mention a thing about pie weights. The crust shrunk down into the pie pan. I tried to save it as best I could, but it was still kinda ugly. My boyfriend tried to make me feel better by saying it looked more homemade that way. I prefer to say "rustic." The first pie was the pumpkin pie.
  The recipe made a little too much filling, so I poured the extra into two small ramekins and baked them alongside the pie. Since the pie was going to be given away I couldn't exactly steal a bite, so I used the ramekins as my tasting portions. The filling was definitely delicious. The ginger flavor was my favorite part. (What's with me and ginger this season??) I recently got word from the recipients of this pie that my uncle Lanny ate ALL of it! My aunt Sherry and my cousins, Stephanie and Samantha, didn't even get a taste! I guess I'm flattered... Lol.
 The second pie I made was a pecan pie. This was my first time ever making a real pecan pie, so I was nervous. I baked it exactly according to the directions. I took it out when the edges were set and the center was still jiggly. It smelled SO good while it was cooling! I gave this pie to my Aunt Michelle. She loves pecan pies, so I hoped I did it right for her. She said it was baked exactly how she likes it. Still gooey
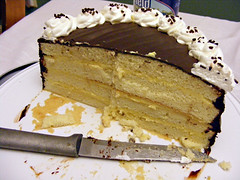 in the middle, not chewey and overbaked. She was nice enough to offer her pie up to everyone at
  Christy's for dessert Saturday night (alongside the Boston Cream birthday cake I made for Tammy's birthday that got devoured within the hour!).
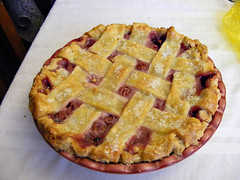 The next pie on my to-do list was the cherry lattice pie. It was my first time attemping a lattice top pie, and I was especially nervous using homemade pie crust because it's very delicate. A few of the strips broke while I was putting them on the pie. Then the warm cherry filling started to soften the strips while I was folding them into the lattice pattern. It was extremely nerve racking, but I was able to mend all the broken strips. I ended up with a very rustic looking pie. The filling was so good. I snuck a little taste while I was making it. Homemade cherry filling is the BEST! I didn't get a picture of the inside of the pie because my aunt Tammy was not in the mood to share. But that's okay, because she texted me the next day and said it was really delicious!
 The fourth and final pie was the one I was most excited to make. The apple cranberry pie was a sinch to put together. The smell of fresh apples and cinnamon is one of my favorite scents in the whole wide world. It comes second in my list of favorite smells only to vanilla cake batter. Now that stuff is pure heaven. But more about the pie. You may be thinking, "Wow, that top crust looks so flaky and perfect." Well remember that pie crust I told you that took a trip to the garbage can? Yeah... It was the top crust on this pie. The one you see in the photo is a
  Pillsbury refrigerated roll-out crust. I'm not afraid to admit defeat. One of my pie crusts was just too crumbly to roll, so I took a little help from the Dough Boy! But the little apple cut-outs came from my own crust, so props to me for something! Another mishap reared it's head when my great aunt Christy sliced into this pie. The filling never thickened up. It was very soupy. I dunno what went wrong. I've made apple pies before, and this has never happened. Any
  advice? Could it have been the recipe? Nevertheless (bringing back some old school vocab!), I stole a tiny bite of the slice of pie we took home to my dad. It was really good. The cranberries added a beautiful flavor throughout the pie. And the apples were cooked perfectly. I like when they still have a little bit of texture. The only suggestion my dad gave was that if I was making that pie for him, he'd want a little less cranberry and a little more apple. Other than that, it got great reviews!
 My favorite cookies this year were the Gingerbread Women. I never really loved gingerbread until we made these cookies. Now I'll be making it much more often!
We always pack our cookies into cute Christmas tins with sparkly tissue paper. We make a list of like 15-20 people and give them all their own special container of cookies. I think this year's cookies have been the best yet! The cookie tins look so perfect. I hope everyone loves them!
 And I hope all of you guys enjoy the recipes. If you make any of these cookies, or any Christmas cookies at all, feel free to e-mail me pictures and stories. I'd love to hear what you guys do during the holidays!
 When I saw this recipe in The Great American Bake Sale cookbook I was like "How cool will we be if we make our own Oreos??!!?" While it seemed like a great idea at the time, I don't think we'll make these again next year. They don't stay crunchy for longer than a day. But they are super delicious on the first day! Dark and chocolatey like a real Oreo. The filling is sweet and so good. We made half of them with mint filling and half plain. I didn't wanna put the mint ones into the cookie tins we were giving away because I was scared they'd make everything else taste like mint. Oh well... more for me! The recipe says to roll the dough up like a log and slice it when it's nice and cold. We definitely didn't do that. I was envisioning lopsided, totally unround Oreos... so I decided it would be better to roll it out like sugar cookies and cut them with small round cutters. We used a tiny 1 1/2" flower shaped cutter. But after they baked, the shape was indiscernable. However they were still ROUND! Mission accomplished. I recommend these, but make them in a small batch and don't plan on keeping them around for more than 2 days.
 Recipe from The Great American Bake Sale


